Jeep Patriot Forums banner

INSTALLING TRAILER HITCH

66K views 50 replies 27 participants last post by  cuz62  
#1 ·
Ok, people, when I bought my Patriot, I was so tired of working on my other truck I told the dealer, "Go ahead and install the hitch for me so I don't have to" after they said "Ok, that'll be $360, parts, installation & tax" I said nevermind.

eBay is my best friend when you know exactly what you are looking for.
So here it is.
Draw-Tite 2" receiver is the same part as several names such as Reese and several others. Just got to Draw-Tites' web site and you'll notice all the various name brands up top. Crazy!
Anyway, the only thing different I've found is when searching for the wiring harness. On the Draw-Tite site they have part # 118552. This one does NOT require you to cut any of the OEM wiring. The tail lights are in-line plugs. The only cutting and crimping you do is screwing a ground lug to the frame and attaching the power load lead to the battery terminal. The rest is non-invasive to the OEM harness. IMO a much better alternative.

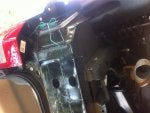
I didn't take pics of the harness, other than what you can zoom in on. The main point of the pics is for anyone wondering how it looks before and after and the level of difficulty.
IMO again, I found removal of the entire bumper fascia to be the easiest method. The fascia is only held in place by 8 screws (4 on each side) and 8-10 plastic clips (sides, underside, and rear) very easy. Then you have tons of working space to pretty things up.
Time frame? ummmmmm I was taking my time and making everything look as professional as possible so I'm thinking it took a total of around 3hrs?
I was constantly in and out monitoring my simmering dinner at the same time so I wasn't really paying much attention to time.
Anyway::blah:
So here it goes. Feel free to ask question at the end. :D
 

Attachments

#2 ·
Additional Pics

Notice the rectangle hole in the bumper fascia. It measures 3"x6" cut using nothing more than a fresh, sharp, box cutter. New plastic is easy to cut.
Also note the trailer plug wire is VERY long compared to a few other posts on here complaining it's too short. This one is 4ft long allowing you to put it anywhere. I just left the slack hanging out and it pushes up inside behind the fascia when not in use. Nice and neat!
 

Attachments

#26 ·
Cutting the bummper

Last pic final assemply. I didn't take pics of the wiring. Wasn't much to look at. If anyone would like some, it's only a couple steps away if needed.
And finally, the weight rating stamp which is NO LONGER visable as it's hiden behind the fascia.
The hitch say cutting is required on 2011 and up. I just got a 2013 with tow package (minus hitch). How much cutting and can you show it?
Lloyd
 
#5 ·
Thanx!

Only one wire. A 12awg from the load block mounted at the driver rear to the positive battery terminal. Very easy and clean if you follow the brake lines.
In pic #4 the block has a white wire that attaches to the frame for ground. The Red wire u see tapped to it is spliced to a black wire running to the front. Then it splices to a yellow at the battery. Why they chose to switch from red to black then yellow is unknown. Maybe the black to help it blend in.
It was an easy install though.
Saved $186 doing it myself. And now I'm familiar with how the vehicle comes apart. Very easily! LoL

Oh and for the weight conscious, I even weighed the unit.
Adding the receiver is 29lbs including nuts and bolts and the wiring bundle.


2012 Patriot Sport 4x4
 
#6 ·
looks good! also looks like i found my next project. thanks for the writeup/pics!
 
#7 · (Edited)
29 lbs huh....I think if you looked around you could have found one about 27lbs..... :) just kidding.

Nice job.

What year Pat? The dealer wants about $400 to install mine, I'd like to give it a go myself.

Oh, just saw your signature line, 2012 4x4 sport, same as mine.
 
#14 ·
Draw-tite.com is 75712
It is a highest price of all makes.
If you go to the FIT GUIDE link it will give u everything.
However, click on any of the manufacturers at the top and do the same fit guide search and you'll get the part #s for each. Then go to eBay or the lowest price possible.


Sent from my iPhone using Autoguide
 
#12 ·
Nice job. How much was the hitch?


Sent from my Autoguide iPad app
 
#13 ·
Hitchsource.com has class III hitches for $100, free shipping. Best price I've seen.


Sent from my Autoguide iPhone app
 
#15 ·
I found the draw-tite brand for $118 and the harness for $56 thru separate venders on eBay.
All the manufacturers at the draw tite website use the exact same design and just slap a different label on it.
Again though, the easiest wiring kit, I've been able to find is only thru www.draw-tite.com
The other ones require cut and splice of the factory harness. This is plug in. And it came with a single page illustration and written instruction. It was very simple.


Sent from my iPhone using Autoguide
 
#16 ·
The ones on hitchsource.com are made by curt. Just FYI.


Sent from my Autoguide iPhone app
 
#18 ·
Same here, I figure though the hitch is probably the most expensive part and looks the easiest being mechanical. I'll do that myself and if I can't figure out the 'no splice' harness I can pay someone to do that. Around here certain small trailers don't require lights anyhow.
 
#19 ·
Billofthenorth:
Northern Avenger:

My dealer uses the new harness which doesn't require the splicing so they charge only 2 hour labor plus parts for hitch and harness. Everyone else I called wanted 2 hours labor for the receiver and 2 hours on the harness because of splicing.

Yes. The hitch is easy to install. The complicated part is cutting the fascia to look right. Seriously, not difficult.

The harness:
Here's how easy I can make it out::
1) Plug in the left socket
2) Plug in the right socket
3) Screw a ground wire to the frame
4) run the black wire from rear to the battery and attach it to the yellow fuse link, then the positive battery terminal with the 10mm bolt/stud already on the battery. Just loosen and attach the yellow fused wire and it's all done.

For anyone nervous or intimidated about electrical, don't be. It really is simplified.


Sent from my iPhone using Autoguide
 
#20 · (Edited)
I put on the Curt Class III from Hitchsource and used the factory plug-n-play harness. It took 3 1/2 hours to install, I lowered the exhaust and removed the rear bumper fascia. This is an easy project it just takes a little time. Getting the exhaust hangers off was most difficult part (silcon spray is your friend here) and you may not have to lower the exhaust if you take the fascia off first. I just started with lowering the exhaust (per the Curt instructions) and found it impossible to mount the three relays in the factory harness unless the fascia was removed. I was able to use the tow hook with bolts still attached on one side of the hitch and the Curt supplied bolts and nuts on the other side. I really didn't see a reason the upgrade the bolts since I don't plan on towing anything other than a small trailer with canoes. If I was planning on towing more weight, I probably would have upgraded from the supplied hardware.
 
#22 ·
I have read of others having to lower the exhaust. I just haven't figured out why. Older years? Different design?
Why? I removed this facia from its 8 screws and 8+ plastic clips and everything went in real smooth.
What year is urs?

And I have heard good things about Curt as well. They are all look like the same design.
Relays? U had more than one?
The draw-tite version only had one load balance block. That's it. Sticky tape to the body and all done.


Sent from my iPhone using Autoguide
 
#23 ·
The factory harness that came with my Pat had 4 relays that bolt to the bumper brackets. The only reason I lowered the exhaust is that that is what the curt instructions said to do. I don't think they even considered the rear fascia since their instructions were for the hitch only. I think you can do it by just removing the rear fascia, although doing both did give a ton of room to work in.
 
#24 ·
awesome write up. i just bought a class 3 curt hitch and wire harness(plug and play curt) super excited to get it on. you wouldn't by chance know what the bolts are that come with the hitch? mine doesnt come with the mounting hardware so i need to get 4 bolts and nuts ect. thanks again for the write up!
 
#25 ·
Excellent write up. Thanks. I just got my Draw-Tite class 3. Was going to have it installed, but now I'm going to do it myself. I have the harness that came with my '11 FDII. Should I install that or the hitch first?


Sent from AutoGuide.com App
 
#28 ·
UPDATE: I have very little/no auto experience, however in am quite handy. I installed the Class III hitch and wiring harness with no problems and without ramps in a short amount of time on my 2011 FDII. I did remove the rear bumper fascia. I installed the wiring first, Then removed the recovery hook and knocked out the bolts.....

Here is where I ran into a problem. To remount the recovery hook with the hitch, It said to drill out the existing holes with a 5/8" drill bit. UNLESS YOU HAVE A MACHINE SHOP DRILL PRESS AND A SPECIAL BIT YOU CANNOT DO THIS AT HOME. I tried with one of the metal bits i have for a while and got through nothing but the paint. So I mounted the hitch without it, not fully tightening the hook side of the hitch. Took it to work at the fire dept. and used a drill press with a metal bit and got NOWHERE. Luckily, one of my fellow FD brothers knows a local machine shop/metal fabricator who was able to do it for me. Removing the bumper fascia and reinstalling the hook on once bored was cake.

Some hitches, I hear, make you go and buy separate longer bolts to give you room to reinstall the hook. The Draw-Tite Class III comes with long enough bolts. Also, I have no problem with exhaust hitting, rubbing or banging.

Hope this helps for future installers.


Sent from AutoGuide.com App
 
#29 ·
I didn't get the dropping of the exhaust either. Once we pulled off the bumper fascia it was just a matter of holding it up and sliding in the bolts. Once that was taken care of I cut the lower Dacia to accommodate for the new receiver and just reinstalled the screws and pins.
Hubby even gave a big WTF for the exhaust drop. Wasn't that much cutting, maybe a 2.5" wide by 3" tall piece we had to cut out.


Sent from AutoGuide.com App
 
#31 ·
just ordered 75712 draw-tite hitch.

will be used for bike rack, hitch basket, recovery point if needed on beach.

$146 total!
 
#32 ·
sigh......


i just spent 2 hours, yes, two hours trying to install the hitch.

there is no way to get the hitch up there by myself. i lowered the muffler down by disconnecting the two hangers, and still could not swing it. Just too long and too heavy for me to maneuver it past the bumper fascia and close enough to one set of holes to insert the bolts and all while on my back.


punting on this one i think. calling my mechanic to see how much they'd charge. i am guessing between 50-100. If more, i will get my gf to help me. She already volunteered but i am just tired of fighting it alone.
 
#34 ·
A suggestion fwiw...


With my back there's no way I would attempt this myself but if I did I was thinking about using a rolling floor jack to lift the hitch into place. Or maybe a couple of jack stands and seesaw it into place. I'm pretty sure the cost of installation is more than $100, at least where I live. Good luck with the installation. I'd be interested to know what your mechanic quotes you for the install. Good luck with it.
 
#33 ·
SF-did you try removing the bumper fascia. That made a huge difference.


Sent from AutoGuide.com App