I did a lot of research, both here and on Google, looking for how to add foglights or driving lights to a Patriot. There seemed to be 2 ways to go. Either order all the MOPAR parts and get the computer updated at the dealer for around $300 or buy a really cheap crappy set of Pilot lights and hack those in place.
I wasn't really happy with either option. Partly because I am cheap, and hate giving dealers money, and on the other side the aftermarket sets had crappy switches and didn't fit well. I figured there must be a happy medium between the two. I set my budget at $150 total, about half what it would cost to have the dealer do it. My other major requirement was that it had to look stock/OEM. I was a little worried about half way through that I was going to go way over budget, but it turned out ok in the end. I did go over budget. Spending about $180, but I also have a LOT of leftover wiring and parts from the kits. If I did it again, I wouldn't need to buy half of the items. What I listed is exactly what I needed to finish, most of the time I had to buy a larger quantity and I listed the full price I payed.
First up, my list of materials. This is everything that I had to purchase for this project. I didn't use any existing materials but I did already have all the tools for cutting drilling, splicing, shrinking, and soldering.
Materials list:
12 feet of 14 guage Red and black automotive wiring(Not speaker) wire $25
12 feet of 3/8" black Wire loom $10
2 H10 electrical connectors $8
1 14 guage quick disconnect power connector $8
1 roll electrical tape $5
1 pack 20 cable ties $5
1 Wiring tap kit $7
1 Heat shrink tubing kit $10
1 MOPAR Auxillary Lighting Harness with Relay $30
1 MOPAR Power Accessory Harness $20
1 MOPAR Auxillary Llighting Switch $15
1 Aftermarket OEM foglight replacement kit $34
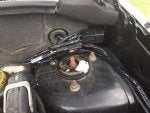
On to the install. The first thing I did was cut off the MOPAR light connector from the relay harness, I had a different style quick connect I wanted to use. After that, I started by mounting/running the MOPAR lighting harness with relay. I mounted the relay on the firewall right next to one of the grommets. There is enough wiring included with the MOPAR Power Accessory harness that you could mount it inside the cabin, but then you would need more power cable to run from the relay to the lights.
![Image]()
Once I had that relay places I snaked the cable through the grommet and down the channel that the factory harness follows behind the fender and into the cab. I had to remove the wheel and fender liner to snake the cable. It comes into the cab in the foot well under the dash.
![Image]()
![Image]()
At that point I needed to decide on a place to mount my switch. I wanted it close to the light stalk so I mounted it in the plastic section below the vent. There was no wiring or metal brackets behind the switch on my Patriot. There were a couple layers of plastic to cut through but it went fine. I used a drill bit slightly smaller than the switch and was able to press in the switch to get a firm fit without the need for the trim ring. Once the switch was mounted I fished the cable down the side of the dash and made the connection with the cable from the engine bay. It was a tight squeeze but I was able to route the cables and had an inch or two extra to spare.
![Image]()
![Image]()
Once that part was done I focused on getting the MOPAR Power Accessory Harness installed. This part includes the connectors to the battery and ground, as well as a 25A weatherproof fuse. It contains the wire leads and terminals that go into the connector with the MOPAR relay harness. I ended up shortening this cable quite a bit as it is long enough to make it into the cabin in case you wanted to use it for roof lighting or rear lighting. Coupe cuts and some soldering/heatshrinking and it was good to go. Otherwise you can just bundle up the extra just as easily. This just runs along the side of the engine bay from the battery to the firewall and you insert the terminal pins into the connector from the relay. Last part of the install for this is to take the white and green wire and connect it to the wire that you want to use for the power to the switch. I connected mine to the parking light wire in the drivers fender because I wanted to be able to turn just the fog lights on without the headlights being on. This way if I turn the parking lights off the fog lights turn off as well, even if the fog switch is set to on. You could also tap it into either the high or low beams if you wanted the switch powered just for those times or connect it straight to the battery if you wanted them to be powered all the time.
![Image]()
With that done, it was time to tackle the fog light harness. This is the custom part of the install as there isn't a factory harness for this application since the factory wires would go to the Total Power Module. I took my time here and routed the cables a few different ways before cutting and soldering everything together. I soldered the H10 connectors to the red and black wires and ran them all through the wire loom to clean it up. I then soldered both sets of wires to the 12 guage quick connect and shrink wrapped the cable and taped it all up. For routing, I ended up following the factory harness that runs across the front over the radiator fans. I cable tied the harness every 6 in along the way, wouldn't want it to fall down and get chopped in the fan. It was really easy to access these areas.
![Image]()
All that was left was to pop out the plastic covers and pop in the OEM lights and plug in the H10 connectors. The lights I purchased use the same mounts as the factory, they just snapped into place on the bumper. No drilling, no cutting. Just push in and they snapped in. They adjust with the same screw mechanism that the factory lights use. You could also get the MOPAR lights but they cost at least twice as much.
![Image]()
Quick test and everything works perfect!
I wasn't really happy with either option. Partly because I am cheap, and hate giving dealers money, and on the other side the aftermarket sets had crappy switches and didn't fit well. I figured there must be a happy medium between the two. I set my budget at $150 total, about half what it would cost to have the dealer do it. My other major requirement was that it had to look stock/OEM. I was a little worried about half way through that I was going to go way over budget, but it turned out ok in the end. I did go over budget. Spending about $180, but I also have a LOT of leftover wiring and parts from the kits. If I did it again, I wouldn't need to buy half of the items. What I listed is exactly what I needed to finish, most of the time I had to buy a larger quantity and I listed the full price I payed.
First up, my list of materials. This is everything that I had to purchase for this project. I didn't use any existing materials but I did already have all the tools for cutting drilling, splicing, shrinking, and soldering.
Materials list:
12 feet of 14 guage Red and black automotive wiring(Not speaker) wire $25
12 feet of 3/8" black Wire loom $10
2 H10 electrical connectors $8
1 14 guage quick disconnect power connector $8
1 roll electrical tape $5
1 pack 20 cable ties $5
1 Wiring tap kit $7
1 Heat shrink tubing kit $10
1 MOPAR Auxillary Lighting Harness with Relay $30
1 MOPAR Power Accessory Harness $20
1 MOPAR Auxillary Llighting Switch $15
1 Aftermarket OEM foglight replacement kit $34
On to the install. The first thing I did was cut off the MOPAR light connector from the relay harness, I had a different style quick connect I wanted to use. After that, I started by mounting/running the MOPAR lighting harness with relay. I mounted the relay on the firewall right next to one of the grommets. There is enough wiring included with the MOPAR Power Accessory harness that you could mount it inside the cabin, but then you would need more power cable to run from the relay to the lights.
Once I had that relay places I snaked the cable through the grommet and down the channel that the factory harness follows behind the fender and into the cab. I had to remove the wheel and fender liner to snake the cable. It comes into the cab in the foot well under the dash.
At that point I needed to decide on a place to mount my switch. I wanted it close to the light stalk so I mounted it in the plastic section below the vent. There was no wiring or metal brackets behind the switch on my Patriot. There were a couple layers of plastic to cut through but it went fine. I used a drill bit slightly smaller than the switch and was able to press in the switch to get a firm fit without the need for the trim ring. Once the switch was mounted I fished the cable down the side of the dash and made the connection with the cable from the engine bay. It was a tight squeeze but I was able to route the cables and had an inch or two extra to spare.
Once that part was done I focused on getting the MOPAR Power Accessory Harness installed. This part includes the connectors to the battery and ground, as well as a 25A weatherproof fuse. It contains the wire leads and terminals that go into the connector with the MOPAR relay harness. I ended up shortening this cable quite a bit as it is long enough to make it into the cabin in case you wanted to use it for roof lighting or rear lighting. Coupe cuts and some soldering/heatshrinking and it was good to go. Otherwise you can just bundle up the extra just as easily. This just runs along the side of the engine bay from the battery to the firewall and you insert the terminal pins into the connector from the relay. Last part of the install for this is to take the white and green wire and connect it to the wire that you want to use for the power to the switch. I connected mine to the parking light wire in the drivers fender because I wanted to be able to turn just the fog lights on without the headlights being on. This way if I turn the parking lights off the fog lights turn off as well, even if the fog switch is set to on. You could also tap it into either the high or low beams if you wanted the switch powered just for those times or connect it straight to the battery if you wanted them to be powered all the time.
With that done, it was time to tackle the fog light harness. This is the custom part of the install as there isn't a factory harness for this application since the factory wires would go to the Total Power Module. I took my time here and routed the cables a few different ways before cutting and soldering everything together. I soldered the H10 connectors to the red and black wires and ran them all through the wire loom to clean it up. I then soldered both sets of wires to the 12 guage quick connect and shrink wrapped the cable and taped it all up. For routing, I ended up following the factory harness that runs across the front over the radiator fans. I cable tied the harness every 6 in along the way, wouldn't want it to fall down and get chopped in the fan. It was really easy to access these areas.
All that was left was to pop out the plastic covers and pop in the OEM lights and plug in the H10 connectors. The lights I purchased use the same mounts as the factory, they just snapped into place on the bumper. No drilling, no cutting. Just push in and they snapped in. They adjust with the same screw mechanism that the factory lights use. You could also get the MOPAR lights but they cost at least twice as much.
Quick test and everything works perfect!